


Whether it’s for home or business, if you need to store and share data over a network, NAS can’t be a better choice. And ripping your Blu-rays into digital files for store in NAS is a great way to clear some space in your living room – and it won’t cost you a penny. This article here will teach you how to backup and convert Blu-ray to NAS compatible videos on Mac OS X El Capitan for watching or sharing on large screen Vivo TV.

It makes a lot of sense to rip and copy the contents of your Blu-rays onto a NAS or hard drive and stick the bulky cases in a box in the attic – or clear them out for good. Thankfully, there’s plenty of free software available to do just that, and as long as you stick to ripping discs that you legally purchased, you’re not doing anything wrong. Advanced users can rip Blu-rays into a same-quality MKV file using MakeMKV, then convert that using an application such as Handbrake. But you should note that although “MakeMKV + Handbrake” provides users a handy Blu-ray converting experience, it is still far from perfect in terms of the supported Blu-ray types, output formats, scanning and ripping speed…
To avoid all these issues, a better suggestion is Pavtube iMedia Converter for Mac– a powerful third-party software to backup dozens of Blu-ray movies to NAS device for Vivo TV playback. (Read review)
With it, you can get the content off the Blu-ray disc as a protection-free and easily readable element like MP4, AVI, MKV for NAS streaming to Vivo TV with no quality loss; it also enables you to copy Blu-ray main movies for backup onto NAS in .m2ts format or 1:1 backup Blu-ray on Mac OS X El Capitan. If you are running on Windows PC, turn to Pavtube Video Converter Ultimate . Now let’s learn how to do it.
To begin with, you need firstly make sure you have the below things prepared for Blu-ray backup.
1. A Blu-ray drive: The must-have thing you need to copy Blu-ray discs to NAS drive. There’re various Blu-ray drives available online. You could purchase one from Amazon or other online stores if you don’t have one.
2. A Blu-ray backup tool: Currently no computer is preset with a Blu-ray drive and Blu-ray backup tool. That’s why you need a Blu-ray backup tool, just like the abovementioned Pavtube Video Converter Ultimate. It’s the simplest but most full-featured Blu-ray backup software app to backup Blu-ray to NAS.
3. Blu-ray movie source: Of course, you need to prepare the source Blu-ray movies for backup, a Blu-ray movie disc, Blu-ray movie folder, or even Blu-ray ISO image file.
4. Anyplace with at least 30G free space storage: Depending on what you’re about to get, you should make sure there’s enough space, either hard drive or blank disc. Blu-Rays are big in content storage. To get high quality backup of source Blu-ray movies, higher storage is required. You need to select a proper drive or prepare a big blank Blu-ray disc for saving the final backup, or make use of an external hard drive if your computer is running out of storage.
5. Internet connection: Make sure that your computer is well connected to the Internet as some Blu-ray discs are encrypted while you need to connect the Internet to remove Blu-ray disc protection and back up Blu-ray disc.
Hot Search: DVD to LG 4K Ultra TV, Blu-ray to Samsung 4K TV, ISO to TV via Chromecast 2, DVD to via Chromecast 2
Free Download or Install:


Other Download:
– Pavtube old official address: http://www.pavtube.cn/imedia-converter-mac/
– Cnet Download: http://download.cnet.com/Pavtube-iMedia-Converter/3000-2194_4-76177788.html
Rip Blu-ray to NAS for streaming to Vivo TV on Mac OS X El Capitan
1. Launch the Blu-ray ripping program for NAS. Then click “Load file(s)” to import the Blu-ray files you want to convert.
Tip: You can check the disc main title and choose subtitle stream and audio track from the Subtitles and Audio drop-down list. To convert DVD including forced subtitles, please check the “Forced Subtitles” box. When it is checked, the subtitles appear on the screen only when foreign languages (i.e. Francais) other than English(the main subtitles track you set) are spoken.

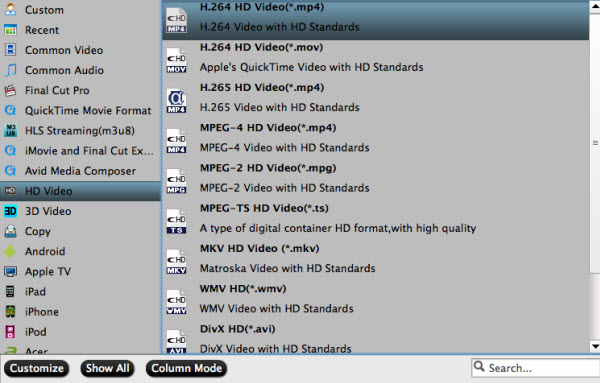
2. Click Format bar and choose your desired format. To store hundreds of Blu-ray’s on NAS for Vivo TV, you can rip Blu-ray to .mp4, or .avi, .mkv, etc compressed format from “HD Video”. And click Settings bar, you can adjust the level of compression to suit the quality you want. (Read TV best supported format)
Tips:
a. If you like, you can click “Settings” to change the video encoder, resolution, frame rate, etc. as you wish. Keep in mind the file size and video quality is based more on bitrate than resolution which means bitrate higher results in big file size, and lower visible quality loss, and vice versa.
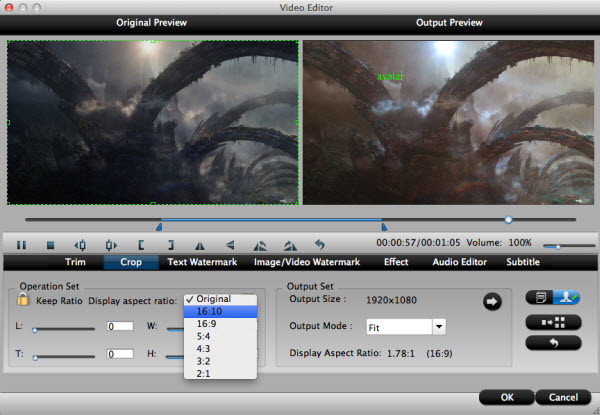
b. You can also trim, crop, add subtitles or adjust aspect ratio, click the pencil-like “Edit selected task” icon and switch to “Crop” tab. Choose Advanced mode, lock the “Keep Ratio” and you can free change aspect ratio. Usually it will be set to “Original”; To playback Blu-ray on Vivo TV with a 16:9 screen display, you can change it to 16:9. (Read details)
3. Press the “Start conversion” button to start ripping Blu-ray for NAS streaming to Vivo TV.
After the conversion, click Open button to find the output files. Make sure the wireless network connection is accessible among the NAS and Vivo TV or other media streamers like WD My Book Live, WD TV. Then just enjoy the high quality Blu-ray movies on your Vivo TV with your family and friends anytime.
More Topics:


