There are several times that you may try to play your DVD movies on your newly purchased Panasonic TV but always end up with failure. The following article will show you how to properly view DVD movies on Panasonic TV via DVD player or USB drive.
Play DVD movies on Panasonic TV via DVD player
Sometimes, the picture from your DVD player is not appearing on your Panasonic TV due to the following 2 reasons:
– Your television is in the wrong mode.
– Your DVD player is not connected to the television correctly.
Following are the procedures to resolve above listed 2 problems.
Putting Your Television into the Correct Mode
To put your television into the correct mode and play a DVD, follow these steps:
1. Turn on your Panasonic TV.
2. Press the TV/Video button on the TV remote control to switch to the correct video mode.
3. Turn on the DVD.
4. Press the Open/Close button. The DVD tray opens.
5. Place a DVD disk on the tray with its label face up.
6. Press the Play/Pause button or the Open/Close button to close the DVD tray. In a few seconds, you should see the initial images from the DVD on your TV.
7. If the picture does not appear, see Connecting Your DVD to Your TV below.
Connecting Your DVD to Your TV
Then follow the steps below to connect your DVD player to Panasonic TV
A Panasonic HD plasma TV uses two different types of audio-video cables to connect cable television service and a DVD player. To take full advantage of the Panasonic’s high-def capabilities, you’ll want to connect the set to an HD cable box with an HDMI (high definition media interface) cable. The DVD player connects with a standard set of composite cables to one of the composite AV inputs on the back of the Panasonic.
A Panasonic HD plasma TV uses two different types of audio-video cables to connect cable television service and a DVD player. To take full advantage of the Panasonic’s high-def capabilities, you’ll want to connect the set to an HD cable box with an HDMI (high definition media interface) cable. The DVD player connects with a standard set of composite cables to one of the composite AV inputs on the back of the Panasonic.
Step 1: Connect the HDMI cable from one of the HDMI input ports on the back of the Panasonic to the HDMI out-jack on the back of an HD cable box. The six-edge plug inserts in one direction only, with the narrow end facing down.
Step 2: Connect the three plugs on each end of the composite cable from the matching color jacks on the back of the DVD player to a set of composite in-jacks on the Panasonic.
Step 3: Turn on the HDTV, the cable box and DVD player.
Step 4: Press the source selection button on the Panasonic remote to watch cable programming or change over to the connection with the DVD player.
Drawbacks of playing DVD movies on Panasonic TV via DVD player
Your physical DVD disc can easily damaged or scratched due to the frequent usage directly on DVD player. In addition, you will spend a lot of time to rifle through your collection and swapping discs to find your favorite DVD movies. The good news is that you can easily fix those issues by ripping your favorite DVD movies into digital file formats, so that you can directly view the digital video on Panasonic TV without touching the original DVD disc.
How to Rip DVD disc for Panasonic TV playback via USB?
To get DVD movies played on Panasonic TV from USB, first you should be clear of what file formats can the viewed on TV via USB drive. You can consult the user manual or promotional material for the particular set to see which formats it supports. After you, you can perform a DVD disc to digital format ripping process with our powerful DVD ripping program called Pavtube BDMagic. The program can powerfully bypass all DVD copy protection including Region code, RCE, key2Audio, UOP, CSS, Macrovision, FluxDVD, Protect, ARccOS, AACS, BD+, ROM Mark, BD-Live, etc. You can then freely rip the non-protected DVD movies to Panasonic TV playable file formats. To get better output video and audio quality for Panasonic TV, just feel feel to adjust the output profile parameters such as video codec, resolution, bit rate, frame rate, audio codec, bit rate, sample rate, channels, etc according to your own needs. If you are not a tech-savvy, you can use our program to directly output Panasonic TV preset profile formats with the optimal playback settings.
For Mac users, you can download Pavtube BDMagic for Mac to get the job completed on the new Mac OS platform.
How to Rip DVD for Panasonic TV Watching from USB?
Step 1: Load DVD disc.
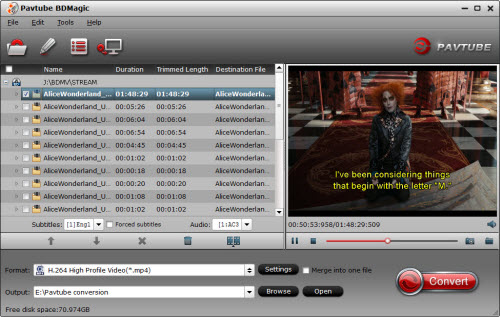
Download, install and run this DVD ripper. You can load DVD by clicking “File” > “Load from disc”. Or load DVD Folder by clicking “File” > “Load from folder” or load DVD IFO/ISO image by clicking “File” > “Load IFO/ISO”.

Step 2: Define the output format.
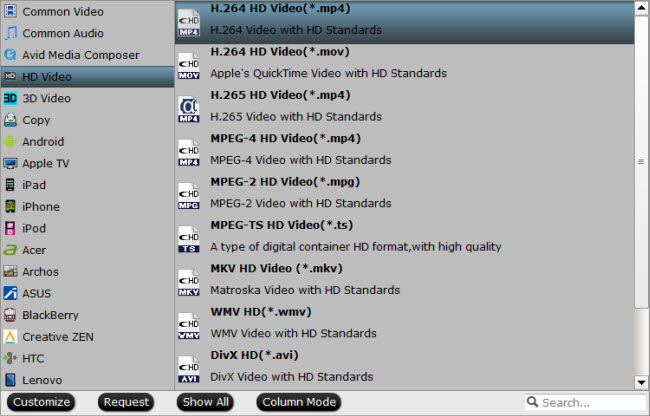
Clicking the Format bar, from its drop-down list, select one of Panasonic TV supported file formats such as “H.264 HD Video(*.mp4)” under “HD Video” main category.

Tips: Click “Settings” on the main interface to open “Profile Settings” window, here, you can flexibly choose or specify exactly the profile parameters including video codec, resolution, bit rate, frame rate, audio codec, bit rate, sample rate, channels, etc as you like to get better output video and audio quality.
You can also choose to directly output Panasonic TV preset profile formats with the optimal playback settings.

Step 3: Begin the conversion process.
After all setting is completed, hit the “Convert” button at the right bottom of the main interface to begin the conversion process from DVD to Panasonic TV supported file formats or preset profile formats conversion process.
When the conversion is finished, click “Open Output Folder” icon on the main interface to open the folder with generated files. Then feel free to transfer the converted files to your USB flash drive, plug the USB drive into your Panasonic TV’S USB port, then you will be able to watch your favorite movies or videos from DVD disc on Panasonic TV without DVD player.


